
*This post is Part 1 of a series that will take you from the very beginnings of starting seeds in a small space, such as a home, apartment, or backyard greenhouse, all the way through to getting your young plants ready to plant outside. Start here today for seed-starting success, subscribe, and come back over the next week or two as we learn what to do at each phase of the growing process.
For so many good reasons, this virus is seeing droves of people turning to home gardening. Lingering concerns over supply, transportation and warehousing breakdown, availability, food security and safe handling, and questions of future cost and affordability are all real reasons people are looking toward being more self-sufficient. The demand for garden seed is proof positive that more people are planning to grow at least some of their own this year.

If you are wondering how you can start seeds to grow your own food in the space that you have, you’re in the right place!
Whatever your space, large or small, this seed-starting method is ideal for successful home gardening and healthy plant starts!
Here, we learn how to start seeds for the home garden with very little space required!
It’s a Very Good Time for Seed Starting
If there is one fortunate thing about all of this, it is that the time is just right for starting your seeds and planning your garden in most locations in the northern hemisphere. And you do not need a large sunroom, greenhouse, or other big space in order to do so. Even in an apartment, if you can spare a dedicated corner, table, or shelf, you can grow your own vegetables, plants, and flowers from seed and have more than enough to fill your patio or even a large garden. In fact, you’ll be amazed at just how successfully you can grow more than enough in a very limited growing area. Here’s how:
Gather Your Seed-Starting Supplies
For this small-space seed-starting method, you will need a few basic supplies:
- Seed starting mix
- Four-inch pots
- Seeds
- Plant labels
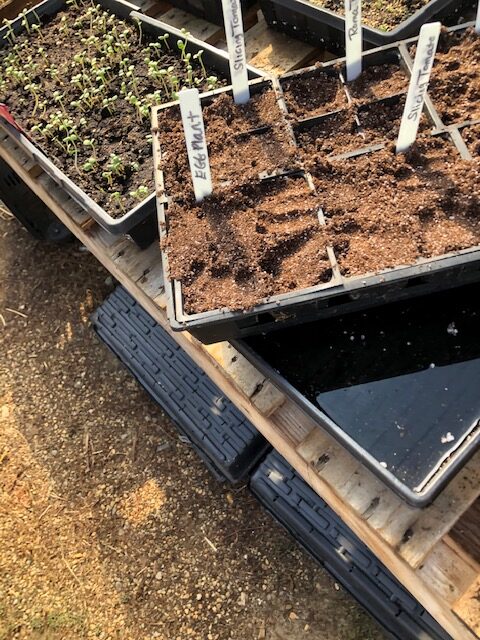
- 1020 plant tray (solid no holes)
- 1020 plant flat (webbed, “daisy flat”)
– Seed Starting Mix. Get a bag of seed starting mix, which is a little different than potting soil. You will not need a very large bag and a small 12-quart bag of inexpensive seedling mix is enough for most home gardeners (depending, of course, on how many seeds you’ll be starting).
Seed starting mix does not contain added fertilizer and is lighter and less dense than regular potting mix. It is also free of large chips and chunks, which are problematic for tiny seeds just getting started. Seedling mix allows seeds of all sizes to germinate and push their way to air and light without being hindered and dying off before they can break through.
Seed starting mix is highly recommended for plant germination but if you really cannot access seed starting mix and must use regular potting soil, sift it through a colander to remove large pieces, sticks, and chunks or chips of wood.

– Seed starting containers. At this stage all you need is something about four inches square that you can use to start each type of seed in. Four-inch square pressed peat or “cow pots” are ideal, however you can even use the segmented plastic cell-pack seedling pots, or even some disposable Tupperware or clean plastic takeout containers (if using recycled containers, make sure to punch drain holes in the bottom for watering and drainage). You will need one container per seed variety or seed type. See the pictures below for an idea of what will work.
– Seeds. Gather all the seeds for the different vegetables or flowers that you plan to plant.
– Plant labels. You will need something to label your pots. Plastic plant labels that can be written on with a permanent marker work best. Craft sticks or popsicle sticks may be used, too, but often wooden sticks end up blurring and can become unreadable when water is soaked into the stick.

– Large flat for watering. This can actually be a plant tray with no holes (such as the long, approximately rectangular 10 x 20 black plastic flats often called 1020 flats) or even a low, long, rectangular Tupperware or plastic storage container will do. Even a 9 x 13 baking pan would do the trick.

– Plant tray or container for holding started containers. Again, a 1020 webbed plant tray, or “Daisy Tray,” is ideal, but if you have some recycled low tray with edges that you are willing to dedicate to plants and dirt, that’s just fine, too.
Step by Step Seed Starting for Small Spaces:
The method I prefer, which was taught to me by the greenhouse manager and head of a local garden store, is what follows here.
This method of seed starting has us starting many seeds in one small vessel rather than in individual pots or cells. (There are a few exceptions to this rule that we will discuss in a later question and answer post). We do this to germinate a lot of seeds in a small space in short time. It does require a second step later on, called “potting up.”
The result is healthy, vigorous plants ready for transplanting out to your beds, patio pots, or garden with very limited loss. This method also lets you start a whole garden’s worth of seeds in just an hour or two and in just about two square feet of space, which could prove very important right now if you are a bit behind getting your seeds started for your new garden.
Each type of seed will be started in one 4 x 4-inch pot. We then water and place them in a good place for germination until ready for the next step.

Step 1. Moisten the seed-starting medium.
Lightly moisten the seed starting mix and mix it through a bit so that the soil is evenly moist.
The seedling soil should not be dripping wet or so wet that it clumps. It should be workable and able to be sprinkled with your fingers. You will water the potted seeds again at the end, but this will work to sort of “prime” the mix so that it can wick up adequate moisture at the end.

Step 2. Fill starter post with seedling soil.
Fill one roughly 4 x 4-inch pot or cell pack with seed starting mix. Fill to about 2/3 full.

Step 3. Make rows or a base for the seeds.
If you are using a pot that is not divided, make small “rows” in the soil using a pencil, popsicle stick, or your finger.
If you are using divided cell packs, fill them no more than 2/3 full and do not make rows.
For most seeds, you are aiming for a row or seed depth between ¼ and ½ inch. Your seed packet will tell you the depth to plant the seed if you are unsure (look for “Planting Depth” listed on the package. If none is listed, plant at a depth of ½ inch).
If in doubt, it is better to plant at a shallower depth rather than one that is too deep and ¼ to ½ inch will work well for most seeds. The reason that this is less important is because you will only be sprouting the seeds in these bulk pots. They will be transplanted “up” later.

Step 4. Plant the seeds.
Sprinkle the seeds along the length of the short rows (in non-divided bulk pots) or evenly over the surface of the soil area in the cell packs.
You do not need to worry about proper seed spacing like you would if you were planting out in a bed, permanent pot, or garden. Try not to overcrowd the seeds; leave a little space between. Also aim for a single seed layer and try not to plant so heavily that you end up with seed on top of seed. Again, the seedlings will be transplanted at a later date, so “proper” seed spacing is not necessary.

Step 5. Cover the seeds.
Lightly cover the seeds with soil to a depth of ¼ to ½ inch by sprinkling more seed-starting soil on top. Gently pat the soil down with your fingers. Be sure to label your pot!

Step 6. Water the seed pots.
Water the pot from the bottom up. To do this, fill a solid plant tray or large, flat, approximately 2-inch deep plastic container with lukewarm water. Place the seed pot into the tray of water.
The soil will draw water from the bottom. Leave the pot in the water just until the top of the soil has completely and evenly darkened, indicating it is evenly and adequately moist.
Remove the pot when the soil is evenly dark. Avoid overwatering.

Step 7. Place labeled pots in a germination tray.
Once planted and watered, place the pot in a tray for germinating. All of your different pots and varieties can go together into this tray (or trays if you need a couple).
You can fit approximately 8, 4 x 4 pots or cell packs in one standard plant flat or tray. That’s 8 different seed varieties in just one standard plant tray!
The basket-like webbed “daisy” trays are ideal, because when it comes time to water your pots later on you can place the entire tray into a solid 10 x 20 black germination tray and quickly and easily bottom-water the pots all at once. (That said, use whatever you have on hand if you need or want to!)
Step 8. Place in a moderately warm, dark space to germinate.
If you think along the lines of mimicking Mother Nature, climate control will come easily to you. Just think about the conditions that your seeds would naturally and ideally prefer if they were to grow outside in their natural habitat. A temperature range of 65-75 is a comfortable level for almost all seeds and at this steady temperature your seed should germinate quickly. This is normal room temperature in most homes, so a comfortable, draft-free corner of your home is a good place for your seeds to be while they work to germinate.
Another natural condition for germinating seeds is darkness…think about a cozy seed tucked into a nice, dark, soil. One way to mimic these conditions is to choose or create a dark space in which to place your germinating seeds. At this point, light is not your goal.
Step 9. Maintain moist soil.
The best thing for you to do for your germinating seeds now, once placed in a warm, dark space, is to leave them alone. Almost.
Your seeds and their soil do need to stay moist, but not wet. It is usually best in the home setting to cover the tray full of seed pots with a covering that will help retain moisture. If it also helps block light, that is even better. A length of plastic wrap, aluminum foil, a large box, or a second solid plant tray placed upside-down over the tray all work well.
Peek in on the seeds once every day or two just to make sure the soil has not dried out. If it is getting too dry, place it in a tray of water again, just until the soil darkens. Do not overwater so that you do not rot the seed. You might also choose to lightly mist or spray the pot with a household spray bottle (a new one that has not held cleaning agents or chemicals!).

Step 10. Patiently wait to pot up!
This is all you are going to do with your seeds for about a week or two. The fastest-germinating seeds, often things like broccoli, cauliflower, cabbages, and similar plants, will pop up first and under good conditions this is usually within 7-10 days. Other seeds, tomatoes, peppers, and eggplant, for example, take longer. You seed packet will estimate germination time so you have an idea of what to expect, but do know there is always a range.
Plan to “Pot Up”
In about two weeks you will have seeds that have germinated and grown early roots. You will need to “pot up” these young seedlings into individual growing vessels until they are ready to be planted outside in their permanent garden (or patio container garden) home.
This interim time is the time when you should plan and purchase any supplies and materials that you do not already have for the next stage of small-space garden plant growing. This will probably include a grow light setup that can be tucked in a small space of your home and provide the light your new seedlings will need as they get growing.
You have a window of about two to three weeks before you need to move on to the next phase, so if you start preparing when your seeds are just tucked away for germinating, you should have plenty of time to order or gather the supplies you need.
Subscribe or check back here for the next post in this series, which will give you important tips, tricks, and information to move on through seed-starting success!
Pingback: Basic Seed-Starting Questions Answered: | the Homemade Homestead
Pingback: Small-Space Seed Starting Part 1.5: What Do I Do Once Seeds Have Sprouted? | the Homemade Homestead
Pingback: Small Space Seed Starting Part Two: Potting Up Your Plants | the Homemade Homestead
Pingback: A Cheap And Easy Grow Light Setup For Garden Seedlings | the Homemade Homestead