Easy Beer Bread – No Yeast Required!

Grocery Store Bread Solutions and Substitutions You CAN Bake at Home!

Beer bread is fast and easy to bake and requires no yeast — and excellent substitute for any day, and especially when grocery store stocks are low!

With grocery store shelves rapidly emptying, it’s hard to get your hands on the everyday staples—bread, of course, being top among them.

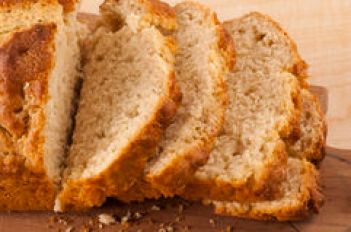
This easy beer bread recipe is a great solution for when you are running out of bread and the store and local bakery are no help.

Beer bread does not need yeast and does not require kneading.

It needs only minimal ingredients that you probably have on hand, and is good for sandwich-making, as a dinner side, cheese plate partner, toast-maker, and much more.

Your biggest problem will be keeping enough made ahead, as it’s a real fan-favorite!

Some things to know about baking beer bread:
>> Beer Bread does not require yeast
>> Soda, seltzer, almost any carbonated beverage can be used in place of beer
>> Four simple ingredients
>> 2 minutes of mixing
>> 1 hour to homemade bread!
>> Great for sandwiches, cheese plates, toast, & more
>> Basic, cheap beer is the best beer to use to make beer bread
>> You can make self-rising flour from basic pantry ingredients if you don’t have any on hand

NB: Most easy Beer Bread Recipes call for Self-Rising Flour. It’s easy to mix up if you don’t have any on hand. Click this link for easy instructions for making your own self-rising flour for your beer bread, or in fact for any recipe that calls for self-rising flour!


Easy 5-Minute Beer Bread

Ingredients:

  • 3 Cups self-rising flour
  • 3 Tablespoons sugar
  • ¼ Cup melted butter, divided
  • 1 Can beer (equal to 12 ounces, or 1 ½ cups)

Directions:

  • Preheat oven to 375 F.
  • Grease a 9 x 5 bread loaf pan (if you do not have a 9 x 5 pan, use whatever size you have—just know that you may need to adjust baking time up or down accordingly).
  • Melt the butter.
  • Combine the self-rising flour and sugar and stir through to combine.
  • Pour in 1/8 Cup of the melted butter (equal to 2 Tablespoons).
  • Pour in the can of beer.
  • Mix through until evenly combined. Try not to over-mix the batter, as this will “deflate” the beer’s carbonation and restrict the rise. It should not take more than a minute or two to mix the batter. Some lumpiness is normal when mixed.
  • Pour mix evenly into prepared bread loaf pan. Pour the remaining 1/8 cup melted butter over the top of the batter.
  • Place in oven and bake at 375 F for 45-50 min. To check if done, insert a toothpick about ½ to ¾ inch in. If it comes out clean or with few crumbs clinging to it, the loaf is done. It should be golden brown on top.
  • Remove from oven and cool for 5 minutes on a cooling rack. After cooling, invert the loaf to remove from the pan and cool before cutting and serving.
  • Enjoy!

A Couple Beer Bread Baking Tips & Ingredient Substitutions:

Beer bread typically has a crisp, crunchy crust due to the butter poured over it before baking. If you prefer a softer crust, mix ALL of the butter into the loaf and do not pour any over the top.

If you do not have beer, or prefer not to use it, you can substitute other carbonated beverages or sodas, such as Coca-Cola, Sprite, seltzer or tonic water. Some bakers have even created interesting flavored beer bread versions with things like Mountain Dew and Cherry Coke.


What’s the Best Beer to use to Make Beer Bread?

As for what type of beer to use for beer bread, you don’t need to overthink this. Use what you have—especially if you’re making beer bread just because you can’t find bread in the store and you need a quick and easy bread substitute!

That said, some darker beers can lend a deeper flavor—try dark ales, porters, Guinness, brown ales. Lite beers will make a lighter, whiter, bread.

The yeastier-tasting the beer, the more similar to a “real” traditional white yeast bread it will taste; but aside from taste, it’s the carbonation in the beer that is bringing the rise to the leavening agents in the self-rising flour, and you are not actually relying on any yeasts from the beers (which by the time of bottling is gone anyway).

Many, many people who make beer bread regularly have this to say about what beer to use for beer bread:

Don’t waste the good beer!

The difference in flavor is not all that perceptible, in the opinion of most beer bread bakers.

And so, it makes sense that you would use the cheapest beer you have on hand, or maybe the beer you don’t care for that got stuck in the back of the fridge.

And that, my friends, is all there is to baking easy beer bread at home–a simple, time-saving solution to bread shortages, or just a good, plain handy, helpful recipe to have on hand for delicious bread any time!

These easy homemade bread recipes are a great way to overcome bread shortages, too! Learn a new old trick that will ensure you never have to fear the bread aisle again!

Those of you with stand mixers might want to check this popular, well-loved bread-baking book, too!

*This post contains affiliate links to helpful books and products, at no additional cost to the reader/purchaser. This will take you to secure login and purchasing via your personal Amazon account. NO personal information is shared with this website from Amazon. Links such as these help to support and maintain this website. Thank you for clicking through to purchase these products!

Make Elderberry Jelly from Dried Elderberries!

Elderberries may be hitting the mainstream now for their promising antiviral benefits, but the truth is that a lot of us homesteading and country types have had a relationship with elderberries for a very long time. Elderberries were always a part of our late-summer preserving in my mother’s and my grandmother’s kitchens.

Blessed with Abundance…Smells Like Childhood

elderberries on stem

If you grew up with elderberries, you’re sure to remember the rich smell of it processing. In my house it was always in the form of jelly. I recall it as a fruity yet rich, deep, earthy flavor, actually something of an acquired taste for me as a youngster, but which I grew to appreciate even more as an adult. We were blessed both on our property and my grandparents’ property next door with an abundant grove. Over the years, though, many of those bushes fell away, probably choked out by more dominant growth, and so, too, did my knowledge of elderberry as a prime food source.

I understand that a few bushes remain and I’ll have to go scouting for some cutting to root for planting elderberries here on the homestead (not that I don’t have native elderberries available near me, and in fact I have plenty of local cuttings, but there’s something about owning a piece of grandma’s elderberry bush that draws me).

Elderberry Knowledge Lost & Re-Found

At some point about five years ago I was reminded of elderberries once again. I think it came to me when we started making homemade wines with the fruits of our land and started looking at things other than grapes to make wine with. An older gentleman at the gym made mention to my husband, who made mention to me, and there was my head-smack moment. Elderberry is the PERFECT flavor for my husband! He’s not much of a sweets-eater, but elderberries are not sweet, and nor are most recipes that use elderberries. Earthy and balanced, he’d love elderberry anything, and I should have thought of it years before. In a wine, elderberry tends toward dark, heavier and dry, and not very sweet. exactly what he’d want. That gentleman sent him home with a bottle, and the rest, well, it’s homemade wine history.

Making Elderberry Jelly from Dried Elderberries

how to make elderberry jelly from dried elderberries

I did, however, manage to convince my husband to let me use a small portion of our first elderberry forages for a batch of jelly. And on this, too, he soon became hooked. Elderberry jelly recipes are pretty basic, and not too involved. The problem is often finding elderberries in season to make them…or being willing enough to spare from the wine for the jelly!

Recently, however, I chanced across a post from an herb and spice company, Frontier Co-Op, that I frequently order from online (usually through Amazon because it gets around their high wholesale minimums). I order from them primarily for ingredients for my homemade elderberry tea mixes. But Frontier had recently shared a post on How to Make Elderberry Jelly from Dried Elderberries. This is a brilliant, simple elderberry jam recipe made from dried elderberries, so you can make it at any time of the year.

One More way To Get Our Daily Dose of Elderberry

Especially in the winter months (but really all year long), we try to incorporate elderberry into our daily diet. We do it for the immune support, the antioxidants and antiviral benefits, the high vitamin and mineral and overall strong nutritional profile, but mostly, we use it for the taste of elderberry. It’s simply delicious! We enjoy elderberry in wine. We enjoy it mostly in tea–it’s not hard to make a tasty, relaxing cup of elderberry tea a part of your daily habit. But we enjoy elderberry in other ways, too; like that jelly and like syrup for yogurt and summertime spritzers.

In the end, I believe we can get far with small changes to our daily diet and a return to traditional, wholesome, nutritional foods like elderberries. The challenge for us in this modern crazy age is finding the ways to incorporate those good foods. Simple recipes like this elderberry jelly that are easy–and delicious!–to use every day make eating well and harnessing the power of healthful traditional foods that much easier. I hope you, like me, SHARE and ENJOY this handy elderberry jelly recipe!

Make-Ahead Mix Day Now for Nook & Other eReaders

You’ve all waited so patiently…all of you who prefer the Nook, Kobo, Sony, or other eReaders over Kindle. And now your patience is being rewarded!

Make-Ahead Mix DayMake-Ahead Mix Day: Complete Instructions for On-Hand Homemade Quick Mixes is now available for the Nook and other popular eReaders! You can purchase now through Smashwords, and in the future on iTunes and other leading retailer’s sites (but it takes a bit for the book to show up in those places).

The best deal is now, though, through Smashwords where you can get my mason jar mix book for 20% off with this coupon code I’ve generated just for you loyal peeps!

Enter coupon code KL83E at checkout for 20% off until July 31st. That’s just about 2.39 for the book! My cup of coffee didn’t cost that much!

Feel free to spread the word and share the code – anyone is welcome to use it. Enjoy!

Creamy Homestead Hot Chocolate

Homemade hot cocoa mixWe’re in New England. Hot Chocolate is an absolute “must” for us. And with four kids, I go through a lot of it. The only trouble is, because we grow nearly all of our food here (with the exception of those staples like flour and sugar, etc.), I don’t actually go to a store all that often. In fact, I hardly ever do even for those things; I actually order most of my staples online from WalMart.com. I know we all have a love-hate relationship with Wal Mart but let’s face it – their prices beat almost everyone else, they employ large numbers of Americans, and if you spend $50 you get free shipping – so my staples cost me no more than a trip to the store; probably less considering the time I don’t lose and the gas I don’t burn.

But I digress. The short story is that I always seem to be out of hot cocoa mix. And then there is the added issue that I am buying something with unnecessary ingredients like dry milk, corn syrup, hydrogenated oils, and artificial flavors, amongst other things that you personally may or may not be concerned with (for an example of what you’ll find in a leading brand hot cocoa mix like Swiss Miss, check this out).

And then there is the issue that I have this abundance of milk from those over-achieving little backyard Jerseys. An awful problem to have, I know. At any rate, it seems silly to me to be paying for a product with dry milk in it, which I’m not overly thrilled about, and wasting the perfectly good, healthy that milk I need to do something with anyway. And so I decided to go old-school and find an easy homemade hot chocolate recipe that is made with milk and minimal extraneous ingredients. After tweaking a few, below is what I came up with. It’s great for homesteaders, but of course it’s great for anyone who is just looking for a simplified homemade hot cocoa recipe. It uses only a couple common pantry staples, so odds are excellent that you already have everything you need at home.

Homemade Homestead Hot Cocoa Recipe

What we’re basically looking at here is a 2:1 ratio of powdered sugar to baking cocoa (powder). Using this basic ratio, you can make up your hot chocolate mix ahead of time in as large or small a quantity as you want for easy make-ahead use (a great recipe to add to your Make-Ahead Mix arsenal!).

The following recipe is enough to make a prepared half-gallon batch of homemade hot chocolate with milk. But what I like to do is crack out a quart or half-gallon mason jar and just keep alternating and filling until I have a jar full of mix ready for later use.

Creamy Homestead Hot Chocolate
Author: 
Recipe type: Hot Beverage
Prep time: 
Cook time: 
Total time: 
Serves: 8
 
An easy, creamy homemade hot chocolate made with real milk and a couple common staple ingredients.
Ingredients
  • 2 cups powdered (confectioner's) sugar
  • 1 cup powdered baking cocoa
  • ½ gallon milk
Instructions
  1. Pour milk into a large saucepan. Add powdered sugar and cocoa powder. Heat and stir over medium heat until steaming. Do not boil!
  2. *You may also prepare this in a crock pot (on high or low, but obviously low will take longer and do keep an eye on it so that it does not boil when on high) and keep warm on the "Warm" setting.
  3. **You may also add a teaspoon of vanilla extract if desired.

Make-Ahead Creamy Homestead Hot Cocoa Mix

If you want to make a prepared make-ahead homemade hot cocoa mix, simply combine 6 cups of powdered sugar and 3 cups of powdered baking cocoa in a large (2 quart) canning jar or large container (yes, it will fit, but you may have to shake gently as you add ingredients to settle them). Shake to combine through until the mixture appears evenly distributed throughout.

This recipe will make 2 quarts of mix, which stores nicely in Ball Half Gallon Mason Jars.

Hot Chocolate Mix RecipeAlternatively, if you are giving as a gift and you like the “sand art” appearance of the layers, alternate the cocoa and the powdered sugar, but do not shake. Do be sure, though, to include shaking as the first step in any attached instructions you give. You can cut the recipe in half to prepare in one-quart canning jars.

To prepare hot chocolate by the cup from the prepared mix, add 2 to 3 large teaspoons cocoa mix to a cup of hot milk. To make a batch, use 3 cups mix to each 1/2 gallon hot milk.

I hope you enjoy this recipe, and it brings you many warm winter mornings and afternoons! Incidentally, this is an excellent recipe to use with any of the grown-up hot chocolate recipes in A Drink for All Seasons: Winter and the Holidays.

Enjoy!

Make-Ahead Mix Day Now Available In Paperback!

Make-Ahead Mix DayIt’s been a busy day, but it’s live and available! You can now buy Make-Ahead Mix Day: Complete Recipes and Instructions for On-Hand Homemade Quick Mixeson Amazon.com in paperback, too!

The paperback version has all of the same great mason jar mix recipes and also includes an appendix of copy-ready labels (two per page for each recipe). Just in time for Christmas, and Christmas jar mix gifts!

Happy reading, Happy Baking, and Happy Baking!

10 Ways to Gift One Simple, Inexpensive Mix

Mason jar mixes are ideal for holiday gift-giving, especially when you have a long list of people to whom you care to show your appreciation. Gift jar mixes have the advantage of being affordable, appreciated, useful and attractive, all at the same time. They can fit the bill for a long line of gift recipients from coworkers to coaches, teachers, instructors, service providers, extended family members, and many more.

To be sure, having a variety of jar mix recipes to choose from is nice, but considering how busy and expensive the holidays can very easily get, it’s nice to have something a bit more versatile that can be worked up and packaged in short time, yet still deliver a number of excellent gift-giving options.

It’s All In How You Look At It

10 Ways to Gift Mason Jar Baking MixTake, for example, the homemade all-purpose baking mix in Make-Ahead Mix Day. This recipe requires a minimal amount of ingredients (a couple cups of shortening, a standard five-pound bag of flour, a bit of salt, sugar, and baking powder), but it yields better than five quarts; and it only takes about five minutes to do it. Cheap and easy. Exactly what the budgeting gift-giver needs. The thing is, this mix can be used in numerous ways. So while you might not really want to give someone a dressed-up jar of “all purpose baking mix”, you’ll feel good about giving a nice homemade “Country Quick Mix” or “Sunday Morning Waffle Mix” with a nice label and instructions attached.

If you take my meaning here, it’s all in the presentation and the suggestion. You’re still giving a great-tasting mix that you’ve put your own time, money, and effort into, but you’re giving it with style in a way you can afford.

You can search this site or the ‘net for different ideas and potential presentations, or go with one of your own favorite tried-and-true classics. Any recipe that uses Bisquick(R) or another biscuit or baking mix will work just fine with this recipe, so simply print the recipe to include with your festively-decorated jar mix (a nice parchment or holiday paper is a nice touch). To get the creative juices rolling, here is a list of ten great ways (in no particular order) to repackage this one simple mix and have a variety of gifting options:

  1. Morning Pancake Mix (what busy Mom or Dad wouldn’t appreciate that?)..top it off with a half cup of chocolate chips or dehydrated fruit and now you have flavored pancakes, to boot.
  2. The aforementioned “Sunday Morning Waffle Mix” (to which the same doctoring methods above apply)
  3. Home Style Country Biscuit Mix
  4. Quick & Tasty Cinnamon Roll Kit (gifted in a basket with a small jar of powdered sugar and nicely-tied baggie or small jar of cinnamon sugar)
  5. Muffin Mix
  6. Quick Bread Mix (with or without additions)
  7. Scone Mix
  8. Cornbread Mix (just add in the 6 TBSP of corn meal – especially nice with a bean mix for soup or chile)
  9. Cupcake Mix
  10. Tea-Time Coffee Cake Mix (throw in a sealed baggie with topping ingredients on top of the mix in the jar)

So you see with a little imagination giving a quality homemade gift does not have to be overly costly or time-consuming. You can feel good about giving gifts to everyone on your list without stressing yourself or breaking the budget.

You can find both an easy all-purpose baking mix suitable for these and many other recipes and a variety of other equally good jar mix recipes for Christmas gifts (or just healthier, more affordable pantry-stocking!) in Make-Ahead Mix Day: Complete Recipes and Instructions for On-Hand Homemade Quick Mixes. It’s available for Kindle and compatible eReader apps as well as in a downloadable PDF.

Be sure to Subscribe to The Homemade Homestead keep up with all the recipes and posts from The Homemade Homestead. You’ll get only updates from this site, and your information will not be sold!

A Glimpse Inside the Make-Ahead Mix Day Companion PDF

Wondering what’s inside the Make-Ahead Mix Day Companion PDF that isn’t in the full-text PDF or Kindle version?

Labels, Labels, and More Labels!

Of course all the recipes are there ready to be printed, too, but the biggest advantage of the printable Companion PDF, and the sole reason it was designed and made available, is to deliver to you an easy-to-use set of labels for every homemade mix recipe in the book. When it comes time to actually use your mix and bake your goodies, you don’t want to have to go searching for the instructions.

Convenience is the first motivation behind the book, and convenience is what you have with your shelves stocked with wholesome, homemade baking mixes complete with labels and instructions. Here’s a glimpse of what you’ll get!

Label Sample Image

These labels couldn’t be easier to use – just print them on your printer, trim the circle with any old pair of scissors (old school!?) and they will fit between the lid and the ring on two-piece canning jar lids. No need to glue them, and they if you save them when you use your mix you can use the same labels again and again.

Ready to buy the PDF? You’ll find all the Make-Ahead Mix Day purchasing options here:

Buy Make Ahead Mix Day and PDF’s


Bisquick Recipes: Beer Batter Chicken Nuggets

One of my family’s favorite Bisquick recipes that I make with my homemade all-purpose baking mix is this one for Beer Batter Chicken Nuggets. I made it as a weekend treat one Saturday and it’s become a fast favorite. I was actually surprised by that because my husband is no fan of fried foods, but this one he loves. So it’s got to be good, right?

Beer Batter Chicken Nuggets Bisquick RecipeAThis recipe can be pretty quick to prepare (although the deep frying takes some time, I won’t lie). The batter itself is extremely easy to make with the homemade bisquick mix recipe here on this site (see link above). If you buy boneless chicken breasts and cut them to size it’ll be fairly short work. Here on the homestead, though, we try to use as much of our own home-grown meat as possible. We process and freeze between 60 and 80 meat birds every year so when I make these I bone out and chunk up the meat from some of my own. When I do this I use the whole bird – light and dark meat all goes into the mix and comes out delicious.

You, of course, should use whatever you prefer. Even if you do not have your own home-grown chicken on hand, buying a roaster and boning/cutting off the meat will still save you a lot of money and will give you a big batch for much less. Don’t worry about making too much, either. I’ve never had leftovers go past the next day, they reheat easily and deliciously in the oven, and once cooked they would be great to freeze and reheat later, too…a great make-ahead convenience treat!

So now, on to the recipe!

Homemade Beer Batter Chicken Nuggets

Bisquick Recipes: Beer Batter Chicken Nuggets
Author: 
Recipe type: Bisquick Recipe, Poultry
Cuisine: Comfort and Convenience Foods
Prep time: 
Cook time: 
Total time: 
Serves: 4
 
A sure family favorite that will leave you shunning freezer-aisle chicken nuggets.
Ingredients
  • 2 to 3 pounds Chicken, cut into approx 1½ inch cubes (or approximate shapes)
  • 1 Cup Homemade All Purpose Baking Mix or Bisquick
  • 1 Egg
  • ½ Cup Beer
  • ¼ to ½ tsp Garlic Powder (to taste)
  • Salt and Pepper to Taste
Instructions
  1. Beat egg slightly, then add beer.
  2. Add egg and beer mixture to measured baking mix.
  3. Stir to combine, until most of the lumps are gone.
  4. Cut chicken to desired size and add to wet batter mixture as you go.
  5. Let chicken chunks stay in the batter until you are ready to fry.
  6. Heat shortening, lard, or cooking oil in a deep frying pan or dutch oven.
  7. When oil is ready, add chicken chunks and fry until golden brown, turning when the first side is browned (about 3 minutes in 365 degree fat).


Bisquick Beer Batter Chicken NuggetsI generally do a lot of nuggets when I do make these, and I usually triple or even quadruple the batch. If you are planning to bone a roaster, plan for one recipe of batter for each whole bird you bone out (so if I bone 3 of my birds, I triple the batter batch). If the chickens you bone are large, you may need a triple batch of batter for every 2 birds. (No worries, though, it’s simple to mix up a bit more batter if you think you need more–takes just a minute!).

These chicken nuggets are also an excellent base for sauces either for dipping (we like honey mustard barbecue sauce) or to coat with for things like Buffalo Chicken Nuggets or Chinese foods like Sweet and Sour Chicken or General’s Chicken (just add sauce & accompaniments & toss).

As always, I hope you do enjoy!


Like this post? Then be sure to SUBSCRIBE so you don’t miss out on more tips and recipes!